目前分類:Linux (51)

瀏覽方式: 標題列表 簡短摘要

wget https://security.appspot.com/downloads/vsftpd-3.0.2.tar.gz
tar -zxvf vsftpd-3.0.2.tar.gz

里歐 發表在 痞客邦 留言(0) 人氣()

wget https://github.com/downloads/libevent/libevent/libevent-2.0.20-stable.tar.gz
tar xzf libevent-2.0.20-stable.tar.gz

里歐 發表在 痞客邦 留言(0) 人氣()

wget https://security.appspot.com/downloads/vsftpd-3.0.0.tar.gz
tar -zxvf vsftpd-3.0.0.tar.gz

里歐 發表在 痞客邦 留言(0) 人氣()

安裝 ntp 伺服器
yum install ntp tzdata

里歐 發表在 痞客邦 留言(0) 人氣()

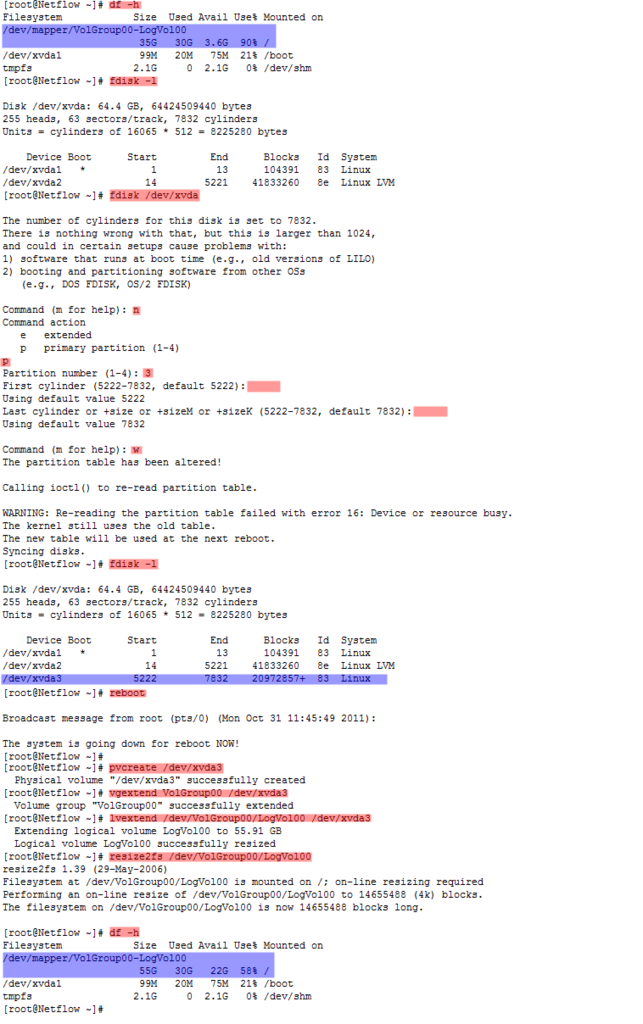
Increasing Disk Space in CentOS using LVM  


里歐 發表在 痞客邦 留言(0) 人氣()

Contents
1 - Summary
2 - Console set to secure
3 - Console set to insecure


1 - Summary

This guide will show how to reset the root password in case you forgot it.
This has been tested in Red Hat Enterprise Linux 4 and 5.


2 - Console set to secure

This method works where the console is set to secure in the /etc/inittab file
without the following line: ~~:S:wait:/sbin/sulogin. When booting into
single-user mode it doesn't prompt for the root password. If you use default
boot loader GRUB, press any key to enter the GRUB menu. Using the arrow keys
select the version of the kernel that you want to edit and press [e] to enter
into edit mode. Go to the end of the line and press space once then add the
word single to tell GRUB to boot into single-user mode. In Red Hat Enterprise
Linux 4 press [b] to boot while in Red Hat Enterprise Linux press [Enter] to
boot.
grub append> ro root=LABEL=/ rhgb quiet single

Reset the password for the root user.
sh-3.2# passwd root
Changing password for user root.
New UNIX password: ********
Retype new UNIX password: ********
passwd: all authentication tokens updated successfully.

Reboot the system and log in with the root account using the new password.
sh-3.2# shutdown -r now


3 - Console set to insecure

This method works where the console is set to insecure in the /etc/inittab file
with the following line: ~~:S:wait:/sbin/sulogin. When booting into single-user
mode it does prompt for the root password. Boot from the installation CD. In
Red Hat Enterprise Linux 4 you will need to type "linux rescue selinux=0" while
in Red Hat Enterprise Linux 5 type the following at the installation boot
prompt.
boot: linux rescue

Select a language at the Language menu and hit [Enter]. Select a keyboard at
the Keyboard Type menu and hit [Enter]. Select No at the Setup Networking
screen. Select Continue at the Rescue menu and hit [Enter]. The rescue
environment will try to find the Linux installation and mount it under the
directory /mnt/sysimage. The next screen lets you know if it was successful or
failed. Hit [Enter] to continue.

Get a list of the disks.
sh-3.2# fdisk -l | grep Disk
Disk /dev/hda: 80.0 GB, 80026361856 bytes

Get information about the hard disk.
sh-3.2# dmesg | grep hda:
<6>    ide0: BM-DMA at 0xf000-0xf007, BIOS settings: hda:DMA, hdb:DMA
<4>hda: WDC WD800BB-75CAA0, ATA DISK drive
<6>hda: max request size: 128KiB
<6>hda: Host Protected Area detected.
<6>hda: Host Protected Area disabled.
<6>hda: 156301488 sectors (80026 MB) w/2048KiB Cache, CHS=65535/16/63, UDMA(100)
<6>hda: cache flushes not supported
<6> hda: hda1 hda2 hda3

View information about the file systems.
sh-3.2# cat /mnt/sysimage/etc/fstab
LABEL=/                 /                       ext3    defaults        1 1
LABEL=/data             /data                   ext3    defaults        1 2
tmpfs                   /dev/shm                tmpfs   defaults        0 0
devpts                  /dev/pts                devpts  gid=5,mode=620  0 0
sysfs                   /sys                    sysfs   defaults        0 0
proc                    /proc                   proc    defaults        0 0
LABEL=SWAP-hda3         swap                    swap    defaults        0 0

Change the root directory to point to /mnt/sysimage and run the passwd command
for the root user.
sh-3.2# chroot /mnt/sysimage /usr/bin/passwd root
Changing password for root user.
New UNIX password: ********
Retype new UNIX password: ********
passwd: all authentication tokens updated successfully.

Reboot the system and login with the root account using the new password. Make
sure to remove the installation CD.
sh-3.2# exit


里歐 發表在 痞客邦 留言(0) 人氣()

*************************************************
******Download Postfix

里歐 發表在 痞客邦 留言(0) 人氣()

尋找當下目錄裡*.jpg且大於1024k並執行ls -lh查看, 將最後結果導入ls_jpg.txt中.
find ./ -name "*.jpg" -size +1024k  -exec ls -lh {} \; > /root/ls_jpg.txt

里歐 發表在 痞客邦 留言(0) 人氣()

安裝及設定 vsftp on centos

  1. 安裝vsftp
    1. yum install vsftpd
  2. 設定iptables的ftp模組 [ vi /etc/sysconfig/iptables-config ]
    1. 修改參數 
      1. IPTABLES_MODULES="ip_conntrack_netbios_ns"

里歐 發表在 痞客邦 留言(0) 人氣()

  • 這是一篇限定共同作者觀看的文章。
    若您是共同作者,登入後即可閱讀。
  • 這是一篇限定共同作者觀看的文章。
    若您是共同作者,登入後即可閱讀。

Prerequisites

  • net-snmp-devel

里歐 發表在 痞客邦 留言(0) 人氣()

  • 這是一篇限定共同作者觀看的文章。
    若您是共同作者,登入後即可閱讀。


里歐 發表在 痞客邦 留言(0) 人氣()

Wu-FTP Server 的安裝與設定

wu-ftp 是檔案傳輸服務程式FTP(File Trasfer Protocol),它是由美國華盛頓大學發展出來的,執行的效率與穩定性都相當好,可惜常常有一些安全上的漏洞,所以要常常注意它的最新消息。

里歐 發表在 痞客邦 留言(0) 人氣()

里歐 發表在 痞客邦 留言(0) 人氣()

Modify SWAP in linux with LVM

一.   安裝lvm

里歐 發表在 痞客邦 留言(0) 人氣()

里歐 發表在 痞客邦 留言(0) 人氣()

Templates for HP Servers
http://forums.cacti.net/viewtopic.php?t=20298&postdays=0&postorder=asc&start=0

里歐 發表在 痞客邦 留言(0) 人氣()

1.安裝及設定

里歐 發表在 痞客邦 留言(0) 人氣()

1 23